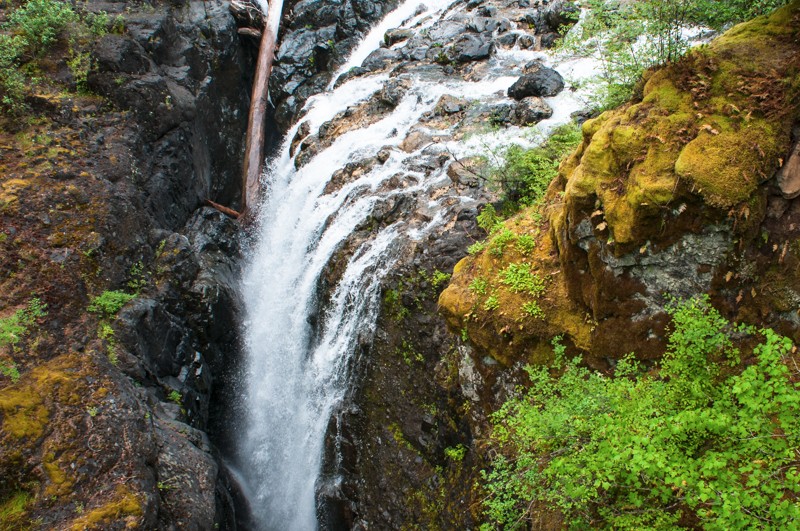
Taken without a filter at ISO 250, 1/200 second at f/8
Perhaps you’ve wanted to photograph a waterfall and capture the nice, silky stream of water going over the rocky edges that you’ve seen in many professional landscape photos. To achieve this effect, you would need to create motion blur, which can be done by slowing down the shutter speed. But if it’s a bright, sunny day, slowing down the shutter speed would increase the exposure time and overexpose the image. You could use the smallest aperture on your camera to limit the amount of light that reaches the sensor. But if you’ve tried these settings before, you might have discovered that you still get an overexposed image. So what is the solution? This situation calls for the use of neutral density filters or ND filters.
Neutral density filters help reduce the amount of light that enters the camera while allowing for a longer exposure to create motion blur. These filters can be thought of as sunglasses for your camera lens, which help block out some of the light and darken the overall image you see through the viewfinder.
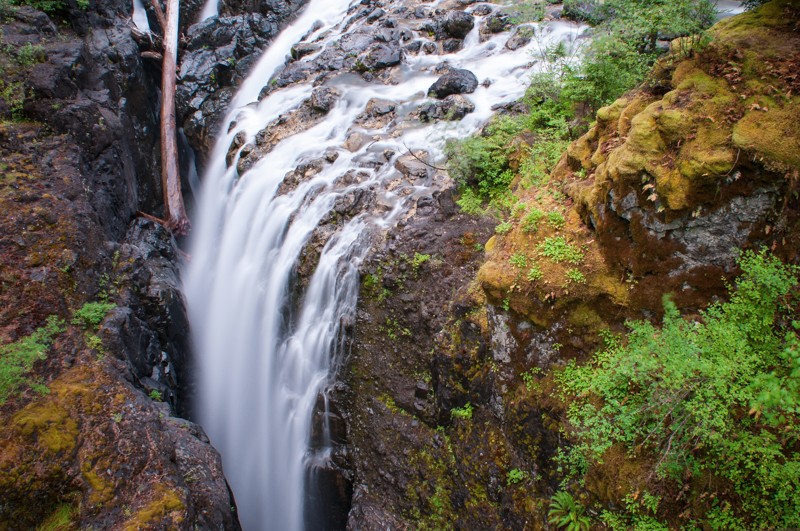
Taken with a 3.0 neutral density filter at ISO 250, 8 seconds at f/8
There are various sizes for ND filters, therefore, it’s important to know the filter size for your lens when buying one. Filter sizes are measured in millimeters and usually come in standard sizes. ND filters also vary in their degree of densities and are measured by the number of f-stop reductions in exposure. Usually, the density of the filter is indicated by a decimal number, such as 0.3, 1.5, 3.0, etc. A neutral density filter with a 0.3 density is equal to one f-stop reduction in light, while a 3.0 ND filter is equal to a 10-stop reduction. In other words, a one-stop reduction only allows 50% of the light to pass through the filter, while a 10-stop reduction only allows 0.098% of light to pass through. You can reference this handy chart for more details—ND filter ratings (source Wikipedia).
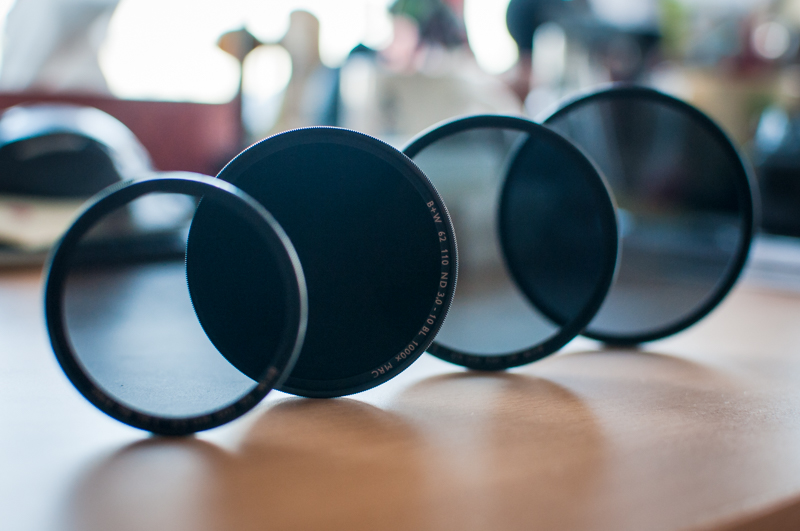
These are neutral density filters in various sizes and densities. The second filter from the left is a 3.0 ND filter and noticeably darker compared to the other filters that have 0.6 and 0.9 ratings.
The ND filters in the image above can be screwed onto the front of the lens. There are also filters that are square-shaped and require an adaptor ring to mount in front of the lens. Both types of filters can be stacked to produce increasing levels of darkness. A third type of filter, which is the variable neutral density filter, allows you to increase or decrease the amount of light that passes through to the lens by simply rotating the front part of the filter. This type of filter eliminates the need to carry a range of different ND filters.
Good quality neutral density filters can be quite expensive and you will want to do some research before making a purchase. Some ND filters can produce a color cast on the overall image, which may not be desirable. This is something you may want to consider when evaluating which neutral density filter to buy. Of course, you can correct the color cast in post-production, or if budget is not a concern, you can spend big bucks on a good quality ND filter.
The 3.0 ND filter, one of the higher density filters, will likely require the use of a tripod to keep the rest of the image in sharp focus. Since it’ll be hard to see through the practically black glass, you’ll need to focus the image before putting the neutral density filter on the front of the lens. It’ll also help to set your camera to the manual focus setting to prevent the camera from automatically trying to focus when you press the shutter button. How do you determine the length of exposure? The simplest way is to start somewhere and adjust based on the result. Every situation will be different depending on the amount of light in the scene. Sometimes you’ll find that a few seconds is all that is needed, while other times you may need half a minute or more to get proper exposure.
If you need to set the exposure to longer than 30 seconds, you’ll need to set your camera to bulb mode. For my camera, I do this by changing to manual mode and then turning the dial for the shutter speed until it shows “bulb” in the display. This may be different for your camera, so check your user manual. I recommend using a remote release to prevent any movement of the camera when taking the photo. If your remote release doesn’t allow you to set the duration for the exposure, then you’ll need to use a stopwatch to time the exposure.
Besides photographing waterfalls, there are many creative uses for neutral density filters. Perhaps you’d like to photograph a landmark without all the people getting in the way. Set your camera on a long exposure and with the appropriate ND filter you’ll be able to get a nice, clean image without a single person (unless they are standing still). You can also experiment with the length of exposure to create varying degrees of motion blur. This effect is a nice way of conveying the passage of time and activity at a busy intersection. Using ND filters to capture the movement of clouds over a long exposure can produce a streaked effect of the clouds. When done over a still landscape, this effect can look especially striking.
The creative uses for neutral density filters are only limited by your imagination. If you’re not ready to take the plunge and invest in a set of your own ND filters, why not rent them and try it out instead? It can be a lot of fun to experiment with and it can expand the creative possibilities in your photography.
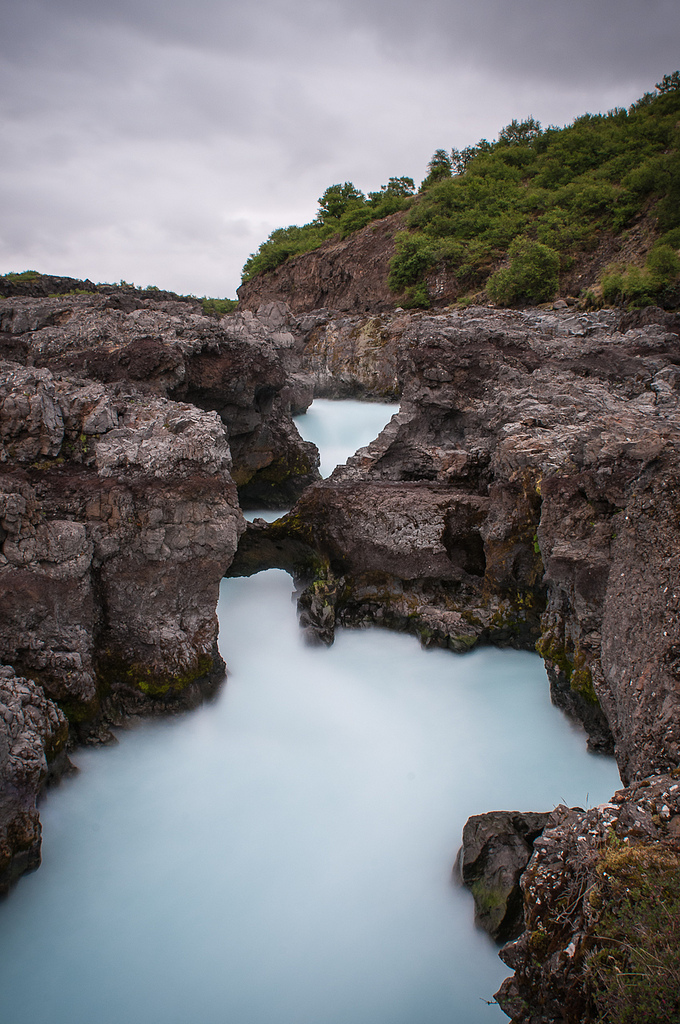
A 10-stop ND filter turns this raging waterfall into a misty water landscape.